
After last week’s backyard BBQ, I had a large plate of leftover ribs that quickly became a challenge. Stored in a regular container, the meat hardened by the next day, and wrapping it with plastic wrap only caused flavor contamination. I discovered that using a vacuum sealer could preserve the ribs’ freshly grilled tenderness for up to four days. Here’s a complete guide to storing BBQ ribs with a vacuum sealer, from equipment selection to step-by-step handling.
Why Regular Storage Fails to Keep Ribs Tender
The juicy texture of BBQ ribs depends on the moisture and fat content of the meat. Ordinary storage methods fail because:
1. Air Exposure Leads to Moisture Loss
Cold air in the fridge accelerates water evaporation. Standard containers or plastic wrap can’t fully isolate the ribs from air, causing the surface to dry and fats to oxidize. I once stored ribs in a regular container for two days and ended up with a tough outer layer, losing all the freshly grilled juiciness.
2. Flavor Contamination
Ribs stored alongside other foods in the fridge often absorb unwanted flavors. The smoky, charred aroma that makes BBQ ribs special can easily be masked by leftover soups, fruits, or sauces. Additionally, exposure to air encourages bacterial growth, making the meat unsafe after three days.
Advantages of Using a Vacuum Sealer
A vacuum sealer does more than extend shelf life; it locks in moisture and aroma, ensuring the ribs taste freshly grilled even four days later. The two main benefits are
1. Air Removal Preserves Moisture and Tenderness
Vacuum sealing removes air from the vacuum seal bags, creating an oxygen-free environment that prevents water evaporation and fat oxidation. The ribs I sealed last week retained visible moisture inside the bag, and every bite was as tender as the day they were grilled.
2. Flavor Protection and Bacterial Control
Complete sealing prevents odor contamination and preserves the smoky flavor. The oxygen-free environment also inhibits most bacterial growth, making ribs safe to consume for up to four days at refrigerator temperatures between 0 and 40°F (0 and 4°C). If you’re looking for reliable home equipment or bags, check out the vacuum sealer shop with product recommendations and user feedback on rib storage.
Step-by-Step: How to Vacuum Seal BBQ Ribs
Vacuum sealing ribs is straightforward. With a vacuum sealer and vacuum seal bags, follow these three steps:
1. Cool the Ribs
Allow ribs to reach room temperature before sealing. High heat can deform the bag or cause leakage. Optionally, blot excess surface fat with paper towels to prevent sealing issues.
2. Portion and Bag
Divide ribs into meal-sized portions to avoid repeated thawing. Leave 1-2 inches of space at the top for effective sealing.
3. Seal the Bag
Place the bag in the vacuum sealer, align the opening with the sealing strip, and select the “wet/meat” mode if available. The machine removes air and seals the bag, usually in under a minute. If your vacuum sealer lacks a meat mode, manually control the vacuum until the bag fits snugly around the ribs without wrinkles. Properly sealed bags should feel firm with no leaks. For detailed machine operation or tips on thick bags, visit the vacuum sealer product guide.
Heating Tips for Maximum Tenderness
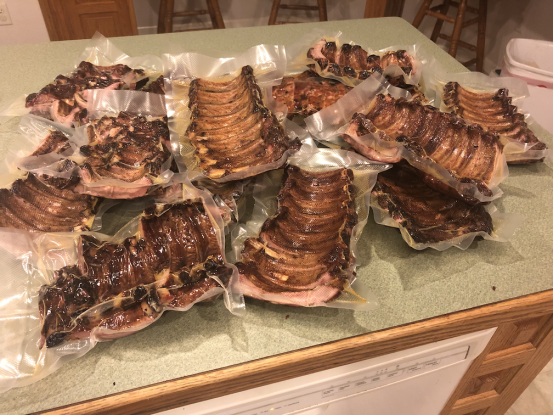
Even perfectly sealed ribs can dry out if heated incorrectly. Follow these guidelines:
1. Keep Refrigerated, Avoid Freezing
Store sealed ribs in the fridge (0-4°C) for up to four days. Freezing can form ice crystals that damage meat texture.
2. Heat Without Opening the Bag
Place sealed ribs in hot water for 5-8 minutes or steam for 10 minutes. This ensures even heating while retaining juices. For a crisp exterior, finish in an oven or air fryer at 350°F (180°C) for 3-5 minutes. The ribs remain tender and flavorful, indistinguishable from freshly grilled.
Choosing a Vacuum Sealer for Home Use
You don’t need commercial-grade machines. Two types are ideal:
1. Countertop Vacuum Sealers
Strong suction, adjustable sealing modes, and versatile use for meats, leftovers, and dry goods. Brands like FoodSaver offer durable, user-friendly options.
2. Handheld Vacuum Sealers
Compact, easy to store, and perfect for occasional use. Works well with textured vacuum seal bags to ensure reliable sealing, especially for thick ribs.
Always choose machines compatible with thicker vacuum seal bags, and stock up on extra bags for convenience. For comparisons and real-user reviews, check the vacuum sealer shop.
Make Leftovers Taste Fresh
Vacuum sealing transforms leftover BBQ ribs into a 4-day culinary treat. Proper handling preserves tenderness, moisture, and flavor, turning what would otherwise be waste into an easy, delicious meal. Using a vacuum sealer has made leftover ribs as enjoyable as when first grilled, saving time and avoiding waste.
Do you use any special techniques for storing BBQ leftovers? A vacuum sealer might be the simplest way to keep ribs soft and flavorful.