
Vacuum sealer techniques are essential when preparing chicken thighs for a barbecue. Without proper sealing, thighs stored in the fridge for just one day can dry out, even when brushed with extra marinade during grilling. Some pieces may even develop bacteria from air exposure, making them unsafe to cook. Using the correct vacuum sealing method ensures chicken thighs stay fresh and juicy for up to three days.
When paired with professional vacuum sealing tools, such as these vacuum sealing devices, each step from pre-treatment to sealing to grilling locks in moisture and flavor, ensuring chicken thighs turn out crisp on the outside and tender inside with every bite.
Understanding Chicken Thigh Spoilage: Why Ordinary Refrigeration Fails
Chicken thighs are naturally tender but prone to moisture loss if stored improperly. Ordinary refrigeration presents three main challenges. Moisture on the surface evaporates over time, particularly where the skin meets the lean meat, resulting in dry thighs after a single day. High heat during grilling then locks in this dryness, leaving the texture fibrous rather than succulent. Air exposure also oxidizes proteins and fats, reducing flavor and creating a faintly unpleasant odor that even heavy marination cannot mask.
Additionally, bacteria can grow on surfaces exposed to air, and after three days, bacterial counts may exceed safe levels, potentially causing digestive issues. Vacuum sealing addresses all of these concerns by isolating air and locking in moisture, keeping chicken thighs in a low-oxygen, fresh state throughout refrigeration.
Pre-Treatment: Key Steps to Lock in Juiciness
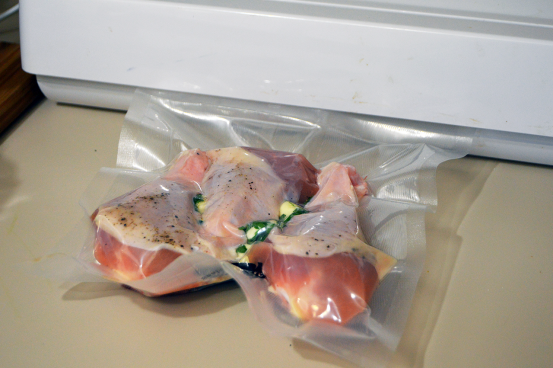
Pre-treatment before vacuum sealing is essential to preserve juiciness. Chicken thighs should not be sealed raw without preparation. First, excess surface moisture must be absorbed without damaging the skin. Rinse the thighs under cold running water to remove blood and impurities, avoiding hot water which coagulates surface proteins and traps internal fluids, producing off-flavors. Then, gently press the thighs with clean kitchen paper until the surface is dry, keeping the skin intact to form a natural protective layer during grilling.
Next, marinate with only dry ingredients and a small amount of fat to add flavor while locking in moisture. A recommended blend for every 500 grams of chicken thighs includes one teaspoon of salt, one teaspoon of ground black pepper, one teaspoon of honey, and one teaspoon of olive oil, massaged evenly for two to three minutes. Salt slightly coagulates proteins, creating a moisture-locking structure, while honey and olive oil form a thin surface film to prevent evaporation. Avoid liquid marinades such as soy sauce or cooking wine, which dilute internal moisture and may generate condensation inside the vacuum bag. After marinating for 15 minutes, the thighs are ready for vacuum sealing.
Vacuum Sealing: Three Steps to Avoid Leaks and Preserve Texture
Vacuum sealing requires complete air removal and tight closure. Choosing the right bag and device is crucial. Select food-grade vacuum bags slightly larger than the chicken thighs, roughly 20 by 25 centimeters for a single thigh, and prefer textured bags that allow the machine to draw out air efficiently. Use a household vacuum sealer with a wet mode for oily or moist surfaces, which ensures gentle suction without compressing the meat.
Arrange chicken thighs in a single layer inside the bag, leaving 1–2 centimeters between each piece. If sealing multiple thighs, use separate bags to prevent stacked compression that could damage texture. Leave 5–8 centimeters of space at the bag opening to avoid marinade or oil interfering with the seal.
Before sealing, wipe the bag opening to remove oil or residue. Place the opening in the sealer slot, ensuring the sealing strip fully covers it. Start the wet mode and monitor the bag as air is extracted. Stop the machine manually when the skin tightens slightly but meat retains elasticity to avoid over-compression. Check the seal by pressing lightly and submerging the bag in water; no bubbles should appear if the seal is secure. Refrigerate at 0–4°C; sealed chicken thighs stay fresh and juicy for up to three days. An easy-to-use vacuum sealing device ensures reliable performance for this process.
Pre-Grilling Preparation: Restore Juiciness Before Cooking
For vacuum-sealed chicken thighs stored for three days, proper pre-grilling preparation preserves moisture. Defrost while still sealed in the refrigerator for twelve hours, keeping juices trapped in the bag. After opening the bag, gently pat the surface dry and brush a thin layer of oil such as corn or butter. This protective layer prevents rapid moisture loss and allows the skin to crisp while the meat stays tender. Grill at medium temperatures (180–200°C), starting with the skin side for five to six minutes until lightly browned, then turn to the lean side for four to five minutes. Avoid excessive flipping; brush a small amount of honey if desired, but refrain from adding excess liquid.
Conclusion: Vacuum Sealing Locks in Freshness and Juiciness
The secret to juicy chicken thighs lies in minimizing moisture loss and isolating them from oxygen. Vacuum sealing achieves both, from drying surface moisture and using dry marinades to proper sealing techniques and protective oil brushing before grilling. Even after three days in the fridge, grilled chicken thighs remain as fresh and succulent as when first prepared. For those who frequently barbecue or like to prep in advance, investing in a professional vacuum sealer guarantees consistently tender, flavorful results. A great barbecue relies not just on fresh purchase but on proper storage—this is the true value of vacuum sealing chicken thighs.