Dorm Life Hacks: Save Half Your Mini Fridge Space with Vacuum-Sealed Leftovers

Living in a dorm last semester, my biggest headache was always the mini fridge. Takeout leftovers packed in bulky food containers filled the shelves within minutes, leaving little room for fruit, milk, or snacks. Even worse, weak container seals meant spills, odors, and spoiled food every week.
That all changed when my roommate introduced me to a vacuum sealer machine. By sealing leftovers in vacuum seal bags, the food volume instantly shrinks by nearly half — freeing up precious fridge space and keeping food fresh longer. After using it for months, I’ve figured out some foolproof hacks that make dorm living easier and more organized.
Why Regular Food Storage Doesn’t Work in Dorm Mini Fridges
Most dorm mini fridges range from 50–100 liters, which means every inch counts. Traditional storage methods actually waste space and create more problems:
Plastic food containers: Convenient but bulky. Three small containers can take up an entire shelf. Plus, weak seals often leak soups or sauces, leaving you scrubbing the fridge for hours.
Ziplock bags: Slimmer, but they don’t remove air. Food takes up the same volume, and greasy sauces easily smear other items. I once stored fried chicken this way — the oil leaked and ruined my yogurt.
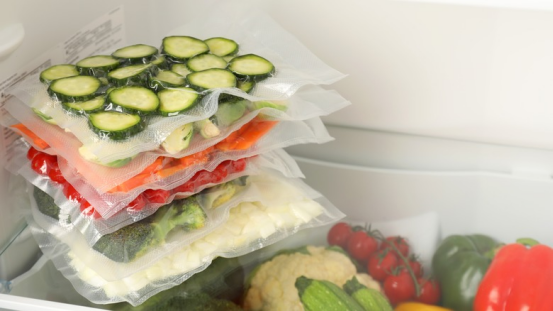
With vacuum sealing, air is removed, bags shrink tight around the food, and odors are completely locked out. For example, one container of pasta originally took up a quarter shelf, but sealed in flat vacuum bags, I can stack three portions in the same space.
Best Vacuum Sealer for Dorms: Compact, Simple, and Stylish
Forget those bulky kitchen appliances — a compact vacuum sealer is perfect for dorm use. The one I use is about half the size of an A4 notebook, less than 2 inches thick, and weighs under 2 pounds. It sits neatly on my desk or even slides into a drawer when not in use.
The design is minimalist (white and gray) and blends well with typical dorm furniture. Even better, it has only two buttons — “Seal” and “Stop.” No complicated modes or confusing settings. My first time using it, I didn’t even need the manual.
Extra features that make it dorm-friendly:
Built-in cutter for trimming vacuum seal bags to size.
Non-slip base so it stays steady on your desk.
Works with common FoodSaver vacuum sealer bags as well as generic brands.
Step-by-Step: How to Vacuum Seal Leftovers in a Dorm
Even if you’re new to vacuum sealing, it only takes four simple steps:
Step 1: Cool leftovers first
Always let hot food cool to room temperature before sealing. Sealing hot curry or soup can melt the bag or create steam that weakens the seal. For saucy dishes, fold a small triangle flap at the bottom of the bag to keep liquid away from the sealing strip.
Step 2: Cut bags to fit
Use the built-in cutter to size bags 2–3 inches longer than your food. Don’t oversize — smaller bags save both space and materials. I keep a mix of small and medium vacuum seal bags for food for snacks, bread, and full meals.
Step 3: Seal safely
Place the open edge in the sealer, flatten it, and press “Vacuum Seal.” Within 30 seconds, the air is gone and the bag is tightly sealed. For dorms, choose a sealer between 80–120W to avoid tripping the breaker. Mine is 100W and runs fine alongside my laptop and desk lamp.
Step 4: Organize in the fridge
Sealed food becomes flat and stackable. I now fit 6–8 meals where only 3 food containers used to sit. Label each bag with a date so you don’t forget what’s inside — I once left chicken sealed for two weeks and had to toss it.
Beyond Leftovers: Hidden Uses for Vacuum Sealing in Dorm Life
Once I got used to it, I started sealing more than just food. Some surprisingly useful hacks:
Snacks: Keep chips and cookies crunchy by resealing opened bags. Plus, bags shrink to half the size.
Bread and bagels: Sealed slices stay fresh longer and can stand upright in the fridge instead of hogging shelf space.
Electronics: Small vacuum bags keep charging cables and earbuds tangle-free and dust-free in drawers.
How to Choose the Right Vacuum Sealer for Dorms
When buying a sealer, you don’t need the fanciest model. Focus on three essentials:
Compact size: Under 10×6×2 inches so it fits in a drawer.
Moderate power: 80–120W for safe dorm use without tripping circuits.
Bag compatibility: Works with standard vacuum seal bags and FoodSaver bags, not just expensive proprietary ones.
Final Thoughts: Small Tool, Big Difference
I used to think my mini fridge’s space problem was impossible to solve. Now, with a vacuum sealer machine, I can store more leftovers, snacks, and even skincare without stress. Food stays fresher 2–3 times longer, I waste less, and I save money every week.
If you’re struggling with limited dorm fridge space, a vacuum sealer with vacuum seal bags might be your best dorm investment. It’s compact, affordable, and guaranteed to make your dorm life easier.