RV Refrigerator Space-Saving Hack: Vacuum Seal Cooked Meats to Prevent Spills on Rough Roads

RV travel comes with two constant challenges: limited fridge capacity and bumpy road conditions. If you store cooked meats in regular containers or standard zip bags, you’ll quickly run into three problems: wasted fridge space, messy leaks, and faster spoilage.
The solution? Vacuum sealing. By compressing volume and removing oxygen, vacuum-sealed packaging makes RV food storage cleaner, safer, and far more efficient. In this guide, we’ll break down the science behind vacuum sealing, practical RV-friendly steps, and key precautions—no product promotions, just actionable tips.
1. Why Vacuum Sealing Works So Well for an RV Refrigerator
The core principle of vacuum sealing is simple: remove the air inside the package and create a low-pressure environment. For RVers, that translates into three big advantages:
A. Volume Compression: Save 30–50% of Fridge Space
Cooked meats like roast beef or chicken breast usually trap air pockets when stored in standard bags or containers. That wasted space adds up quickly in a compact RV fridge.
A 1 lb (≈500g) block of cooked meat stored normally is about 2–2.5 inches thick.
Once vacuum sealed, thickness drops to 1–1.2 inches—nearly half.
Instead of fitting two pieces on a shelf, you can now stack four or five, maximizing narrow vertical RV fridge space.
B. Spill-Proof on Rough Roads
Unpaved roads can jolt your RV by several inches. In regular storage, air gaps let food shift and liquids slosh. A box of ribs in sauce can easily spill into the fridge.
Vacuum sealing solves this by pressing the packaging tightly against the food, leaving no space to slosh. High-quality vacuum bags with heat-sealed closures hold up to 0.1–0.3 MPa pressure (1–3 atmospheres), locking in even saucy meats without leaks.
C. Extended Shelf Life
Bacteria thrive in oxygen-rich environments. With standard cold storage (32–39°F), cooked meats last only 1–2 days. Vacuum sealing removes 95% of oxygen, slowing bacterial growth by up to 10–20x.
In an RV fridge (cold storage 32–39°F), vacuum-sealed cooked meats last 3–5 days.
In the freezer (-0.4°F / -18°C), they stay fresh 3–6 months, with reduced risk of freezer burn.
For trips ranging from a weekend getaway to cross-country journeys, vacuum sealing keeps your RV meals safe and fresh.
2. How to Vacuum Seal Cooked Meats for RV Travel: 4 Key Steps
Step 1. Prep the Food First
Cool Before Sealing: Don’t vacuum-seal hot food. Let it cool to room temperature (~77°F / 25°C). Sealing hot food traps steam, weakens suction, and increases bacterial risk.
Portion by Serving Size: Split into single-meal packs (e.g., 8 oz per bag for two people). This prevents repeated unsealing and resealing.
Trim Bones & Drain Excess Liquids: Sharp rib bones may puncture bags; trim them or use thicker bags (≥4 mil). For saucy foods like braised ribs, drain excess liquid and leave just enough for flavor.
Step 2. Choose the Right Packaging
| Food Type | Best Vacuum Packaging | Why It Works |
| Boneless blocks (roast beef, chicken breast) | Flat vacuum bags | Stackable, slim, saves vertical space |
| Bone-in meats (ribs, wings) | Extra-thick vacuum bags (≥4 mil) | Prevents punctures and leaks |
| Saucy meats (stewed pork, braised ribs) | Stand-up vacuum bags or vacuum containers | Prevents liquid leaks near seal |
| Small portions (shredded meat, ground meat) | Mini vacuum bags (≤200 ml) | Fits snugly, avoids wasted bag space |
Step 3. Vacuum Seal Like a Pro (RV Edition)
Portable Devices First: Handheld vacuum sealers or compact countertop models work best in RVs. They’re lightweight, rechargeable, and small enough to store in a drawer.
Adjust Suction Strength:
Firm meats = full vacuum.
Liquids/soups = partial vacuum (leave ~10–20% air to avoid sucking liquid into the device).
Soft foods (meatballs) = low suction to preserve texture.
Seal Check: Tug the seam gently—no gaps. For double-checking, submerge the sealed edge in water. No bubbles = secure seal.
Step 4. Organize Inside the RV Refrigerator
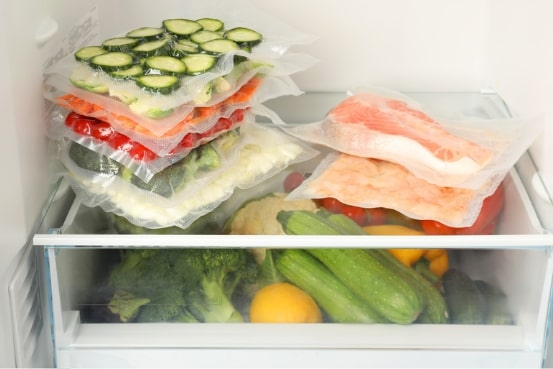
Stack Flat, Vertical Layers: Use shelves to stack vacuum bags upright like files, fitting 3–4 layers in one slot.
Fill Gaps: Place small packs (ground beef, meat strips) in side gaps and door shelves.
Label Clearly: Write food type + date (e.g., “Chicken Breast – Sept 20”). For SEO clarity, remember: how long does vacuum sealed meat last → 3–5 days refrigerated, 3–6 months frozen.
First In, First Out: Place older packs at the front/top, newer ones behind/below.
3. RV-Specific Tips and Common Mistakes to Avoid
Mistake 1. Over-Sealing
Wrong: Thinking “the tighter, the better.” This crushes delicate meats or causes leaks in liquid foods.
Right: Seal until the bag clings without distorting texture.
Mistake 2. Ignoring Temperature
Wrong: Leaving sealed meats at room temp for hours. Vacuum sealing slows spoilage, but bacteria still multiply if food sits in the danger zone (40–140°F).
Right: Refrigerate within 30 minutes of sealing. Use cooler bags with ice packs if your RV fridge isn’t running.
Mistake 3. Running Out of Supplies
Wrong: Bringing only a few bags.
Right: Pack enough vacuum bags (2–3 per person per day), plus an extra roll for emergencies. Carry one manual hand pump and reusable zipper-style vacuum bags as backup.
4. Conclusion: Vacuum Sealing = Smarter RV Food Storage
For RV travelers, vacuum sealing isn’t just about saving fridge space. It’s the difference between chaotic, leaky food storage and an organized, worry-free kitchen on wheels.
By compressing volume, preventing spills, and extending shelf life, vacuum sealing helps even a 3.5 cu. ft. RV refrigerator hold enough cooked meats for 3–5 days with ease.
Master the process—prep, package, seal, organize—and you’ll transform how you store food on the road.