Vacuum Sealer for Community Garden Tomatoes: Keep Them Fresh and Juicy for 10 Days

Community garden tomatoes are prized for their juiciness and sweet flavor at peak ripeness. However, once picked, they can quickly become soft or shriveled if left at room temperature for 2-3 days. Refrigeration can also cause condensation, leading to mold growth. Using a vacuum sealer with proper vacuum seal bags isolates air and moisture, keeping tomatoes fresh for up to 10 days. This guide covers everything from tomato prep to DIY vacuum sealer usage, ensuring home vacuum sealing success even for beginners.
1. Prepping Tomatoes: Three Essential Steps Before Using a Vacuum Sealer
Proper tomato preservation begins with preparing the fruit to be clean, dry, and undamaged. This prevents moisture or bacteria from accelerating spoilage during storage.
Step 1: Select Ripe but Firm Tomatoes
Choose tomatoes with smooth skin and no soft spots or blemishes. The ideal ripeness allows for slight give when gently squeezed. Overripe tomatoes are prone to rot after vacuum sealing, while underripe tomatoes may lack flavor.
Handle minor surface damage carefully. Trim small scratches without exposing flesh. For deep cuts or juice leakage, consume immediately rather than attempting long-term storage.
Step 2: Wash and Dry Thoroughly
Rinse gently under running water to remove dirt and debris. Avoid scrubbing hard, which can damage the skin. Use a soft cloth for stubborn residues.
Dry completely using a kitchen towel, paying attention to crevices around the stem. Excess surface moisture can create a humid environment inside vacuum seal bags, compromising the effectiveness of your vacuum sealer.
Step 3: Decide Between Whole or Cut Tomatoes
Whole tomatoes: Ideal for salads or display. Remove long stems to prevent puncturing vacuum seal bags.
Cut tomatoes: For cooking or soups, slice into 2-4 pieces and gently blot excess juice. Too much liquid can interfere with vacuum sealing and cause condensation inside the bag, reducing the vacuum sealer’s efficiency.
2. Using a Vacuum Sealer: From Equipment to Storage
A vacuum sealer and vacuum seal bags allow you to maintain tomato freshness longer. Home vacuum sealing is straightforward with a basic countertop vacuum sealer.
Step 1: Choose the Right Vacuum Sealer and Bags
Vacuum sealer: Select a small home countertop vacuum sealer. Adjustable vacuum levels are ideal; use medium to low suction for tomatoes to avoid crushing soft fruit.
Vacuum seal bags: Food-grade PE+PA composite bags, 8-12 mil thick. Size according to tomato type: 15x20cm for whole tomatoes, 10x15cm for cut pieces. Avoid regular plastic bags; they do not seal adequately and allow air in, rendering your vacuum sealer less effective.
Tip: Some vacuum sealers offer fruit or vegetable modes specifically for delicate produce, perfect for tomato preservation.
Step 2: Fill Bags Correctly
Individual portions: Pack 2-3 whole tomatoes or 1 bowl of cut tomatoes per bag. Avoid large bags that require repeated opening, which introduces air and reduces your vacuum sealer’s efficiency.
Placement: Keep whole tomatoes separated inside the bag, not stacked. For cut tomatoes, arrange slices cut-side up to avoid juice contacting the bag seal, ensuring the vacuum sealer maintains a strong seal.
Step 3: Vacuum Seal with Care
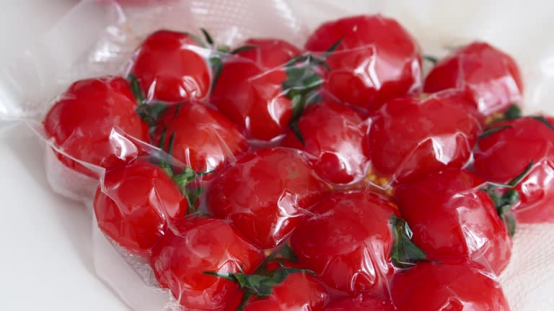
Preheat your vacuum sealer according to manufacturer instructions.
Insert the bag opening into the sealing slot, leaving 1-2 cm beyond the edge to prevent juice from entering the machine.
Activate the vacuum using medium-low suction or vegetable mode. Pause manually if tomatoes compress excessively to protect their texture and maximize the performance of your vacuum sealer.
Seal the bag and let it cool for 10 seconds before removing. Inspect for proper sealing. A correctly sealed bag ensures tomatoes stay fresh longer.
Step 4: Verify Seal Integrity
Press gently on the bag. No air should escape, and the seal should be flat and wrinkle-free. If air bubbles or bag inflation occurs, reseal using a clean edge of the bag with your vacuum sealer.
3. Storage and Usage Tips
Vacuum-sealed tomatoes maintain freshness longer, but proper storage and careful handling extend this further.
Step 1: Choose the Right Storage Environment
Short-term (1-3 days): Store at room temperature in a cool, ventilated area away from direct sunlight and heat sources (15-20°C). Tomatoes remain juicy for up to 10 days.
Longer-term (5-10 days): Refrigerate in the coldest section (0-4°C). Allow to reach room temperature for 10-15 minutes before eating for optimal flavor.
Avoid freezing whole or cut tomatoes; freezing breaks cell walls, causing a soft, mushy texture. Frozen tomatoes are suitable only for sauces.
Step 2: Handling After Opening
Consume promptly. Once opened, eat the tomatoes the same day.
Resealing leftovers: Blot surface moisture, use a new vacuum seal bag, and reseal with your vacuum sealer. Original bags lose vacuum integrity after opening.
Step 3: Quality Check
Fresh tomatoes after 10 days should have smooth skin, slight firmness, and no odor. Discard if mold, soft spots, or unpleasant smells appear.
4. Summary: Prepping, Vacuum Sealing, and Proper Storage Ensure Maximum Freshness
By following the process of tomato prep, using a vacuum sealer with quality vacuum seal bags, and storing appropriately, community garden tomatoes stay fresh and juicy for up to 10 days. Even beginners can achieve professional-quality home vacuum sealing results without wasted produce.
For home vacuum sealers and vacuum seal bags designed for fruits and vegetables, visit https://buyvacuumsealer.com/shop/. The site categorizes products by home use and provides detailed instructions for effortless tomato preservation.